
In modern web development, optimizing page loading performance is crucial for enhancing the user experience. As the complexity of web applications increases, preloading resources reasonably becomes particularly important. Preload and prefetch are two powerful techniques that can help developers load key resources in advance, thereby reducing the waiting time for users. This article will introduce in detail the concepts, differences of preload and prefetch, and how to implement image preloading in Vue.js.
What are Preload and Prefetch?
Preload
Preload is an HTTP/2 mechanism used to inform the browser to load a certain resource in advance. It is achieved by adding the <link rel="preload"> tag in the <head> of the HTML file. The role of preload is to ensure that the browser fetches key resources as early as possible during page loading, thus reducing the latency of page rendering.
Prefetch
Prefetch is also a preloading mechanism, but it is different from preload. Prefetch is used to inform the browser to preload resources that may be used on subsequent pages. It is achieved by adding the <link rel="prefetch"> tag in the <head> of the HTML file. The role of prefetch is to optimize the user experience by preloading resources and reducing the waiting time when users navigate to the next page.
Differences
Loading Timing:
- Preload: Loads immediately when the current page is being loaded.
- Prefetch: Loads when the browser is idle after the current page has finished loading.
Resource Types:
- Preload: Usually used to load key resources of the current page, such as CSS, JavaScript, or images.
- Prefetch: Usually used to load resources that may be needed on subsequent pages.
Priorities:
- Preload: High priority, and the browser will load it as soon as possible.
- Prefetch: Low priority, and the browser will load it when idle.
Implementing Image Preloading in Vue.js
In a Vue.js project, we can implement image preloading through Webpack plugins and Vue components. The following is a complete implementation plan, including the code for Webpack plugins and Vue components.
Creating a Webpack Plugin
First, we need to create a Webpack plugin to dynamically generate <link rel="preload"> tags during the build process.
// PreloadImagesPlugin.jsconst HtmlWebpackPlugin = require("html-webpack-plugin");const path = require("path");const fs = require("fs"); class PreloadImagesPlugin { constructor(options) { this.options = options; } apply(compiler) { compiler.hooks.compilation.tap("PreloadImagesPlugin", (compilation) => { compilation.hooks.htmlWebpackPluginAlterAssetTags.tapAsync("PreloadImagesPlugin", (htmlPluginData, callback) => { const images = this.getImages(); const rel = this.options.rel || "preload"; // Default value is 'preload' const preloadTags = images.map((imgSrc) => ({ tagName: "link", voidTag: true, attributes: { rel: rel, // Use the rel value in the configuration or the default value href: imgSrc, as: "image", }, })); htmlPluginData.head = htmlPluginData.head.concat(preloadTags); callback(null, htmlPluginData); }); }); } getImages() { const imagesDir = path.resolve(__dirname, "../src/assets/images"); // Adjust the path to match the project structure const files = fs.readdirSync(imagesDir); return files.filter((file) => /\.(png|jpg|jpeg|gif|svg)$/.test(file)).map((file) => `/assets/images/${file}`); // Convert to the Webpack output path }} module.exports = PreloadImagesPlugin;Configuring the Plugin in vue.config.js
Next, introduce and use this plugin in the vue.config.js file.
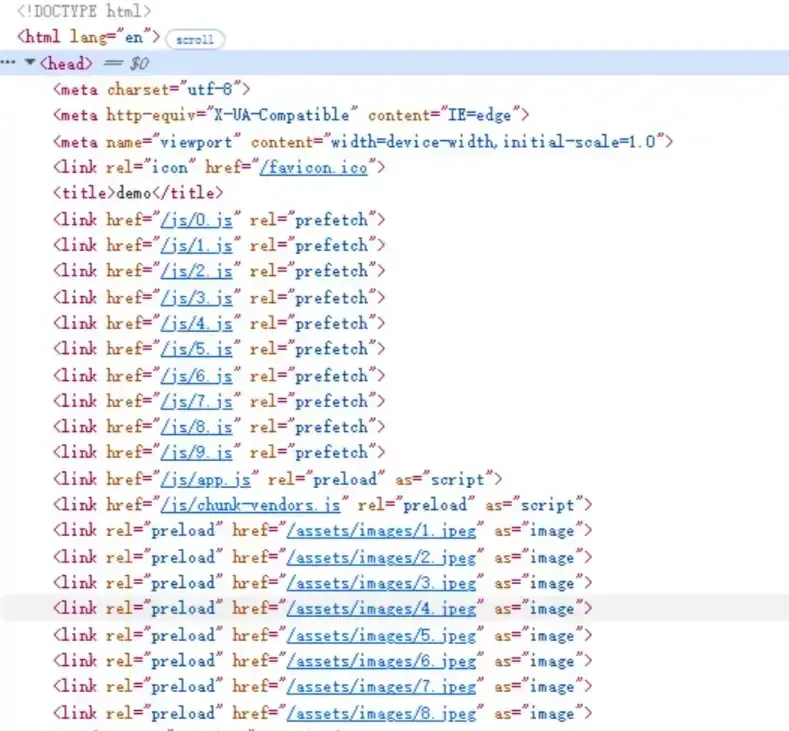
// vue.config.jsconst PreloadImagesPlugin = require("./PreloadImagesPlugin"); module.exports = { configureWebpack: { plugins: [ new PreloadImagesPlugin({ rel: "preload", // Optional, default value is 'preload' }), ], },};Effect Demonstration
Summary
Preload and prefetch are two powerful preloading mechanisms that can help developers optimize page loading performance and enhance the user experience. In a Vue.js project, by combining Webpack plugins and Vue components, image preloading can be easily achieved. I hope this article can help you better understand and apply these technologies to optimize the performance of your web application.
{{optionContent}}