Introduction
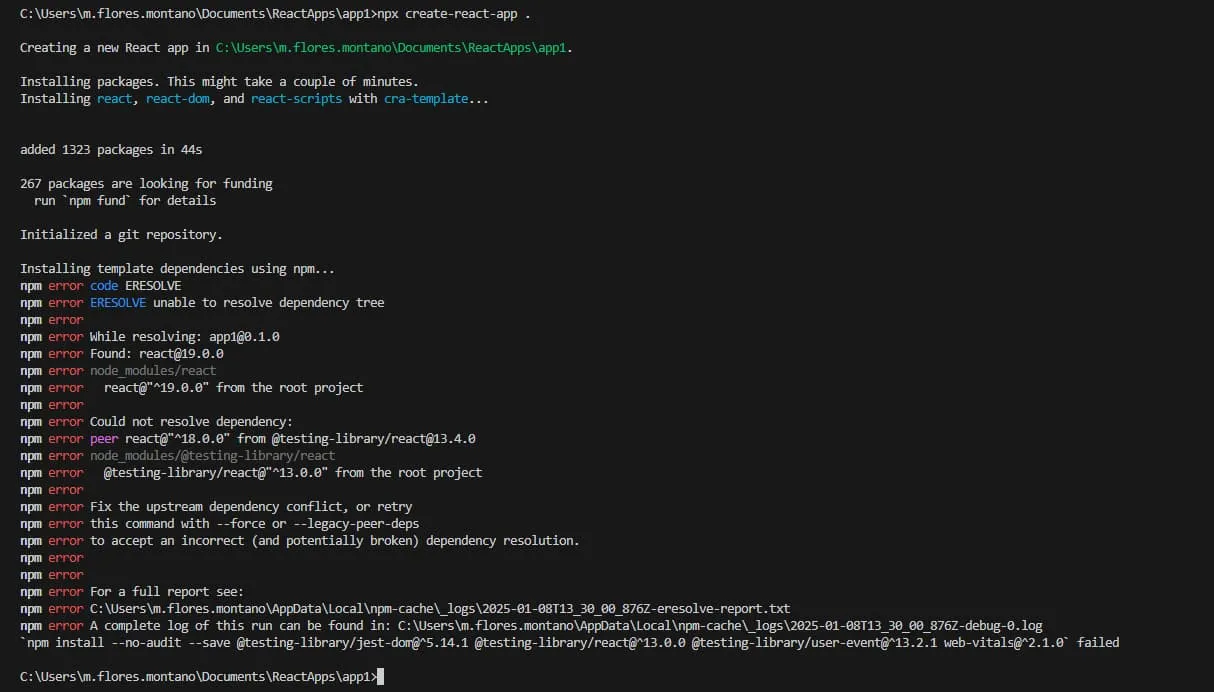
When embarking on the journey of developing React applications, developers often encounter a myriad of challenges. One particularly vexing issue is the ERESOLVE Unable to resolve dependency tree error, which can throw a wrench into the project setup process. This error typically surfaces when initializing a new React project using npx create-react-app . and attempting to install dependencies via npm. It not only disrupts the workflow but also necessitates time-consuming debugging efforts, which can be frustrating and counterproductive for developers eager to dive into coding.
Understanding the Problem
The Error in Context
The ERESOLVE error is a clear indicator of a dependency conflict within your React project. It occurs when npm is unable to reconcile the versions of different packages specified in your package.json file. This inconsistency can lead to a broken dependency tree, preventing the successful installation of all required packages.
Root Cause Analysis
At the heart of this problem lies a package version mismatch. When npx create-react-app generates the initial package.json file, it may set the React version to 19. However, the @testing-library/react@13.4.0 package, which is commonly included in the generated dependencies, is only compatible with React 18. This version disparity creates a conflict within the dependency tree, triggering the ERESOLVE error. Such incompatibilities can arise due to the rapid pace of package evolution and the lack of seamless synchronization during the project initialization process.
Solutions to the ERESOLVE Dependency Tree Error
Solution 1: Downgrading the React Version
One effective approach to resolving this issue is to downgrade the React version to a compatible one. This involves manually editing the package.json file to specify the desired React and react-dom versions.
Step-by-Step Guide
Open the
package.jsonFile:- Navigate to your project directory and locate the
package.jsonfile. - Open it in your preferred code editor.
- Navigate to your project directory and locate the
Modify the React and React-DOM Versions:
Locate the
dependenciessection in thepackage.jsonfile.Change the React version to
"react": "^18.2.0"and thereact-domversion to"react-dom": "^18.2.0".Your
package.jsonfile should now resemble the following snippet:{"name": "your-project-name","version": "0.1.0","private": true,"dependencies": {"react": "^18.2.0","react-dom": "^18.2.0","@testing-library/react": "^13.4.0",// other dependencies...}}
Reinstall Dependencies:
- After making the changes, save the
package.jsonfile. - Run
npm installin your terminal to reinstall the dependencies with the updated versions.
- After making the changes, save the
Install Additional Packages (if necessary):
- In some cases, you may also need to run
npm install web-vitalsto ensure all required packages are installed.
- In some cases, you may also need to run
By downgrading the React version, you resolve the version conflict within the existing Create React App setup, allowing the project to proceed without the ERESOLVE error.
Solution 2: Using Vite Instead of Create React App
Another viable alternative is to abandon Create React App altogether and opt for Vite, a modern front-end build tool that offers a faster and more efficient development experience.
Step-by-Step Guide
Initialize a New Vite Project:
Open your terminal and run the following command to create a new Vite project with the React template:
npm create vite@latest my-app --template reactReplace
my-appwith your desired project name.
Navigate into the Project Directory:
After the project has been created, navigate into the project directory using the following command:
cd my-app
Install Project Dependencies:
- Run
npm installto install all the required dependencies for your Vite project.
- Run
Start the Development Server:
- Finally, start the development server by running
npm run dev. - This will launch your React application in development mode, and you can access it in your browser at
http://localhost:3000(or the port specified by Vite).
- Finally, start the development server by running
By choosing Vite, you bypass the version conflict issues associated with Create React App and enjoy a smoother development experience. Vite's fast hot module replacement (HMR) and optimized build process make it an excellent choice for modern React development.
Conclusion
The ERESOLVE Unable to resolve dependency tree error can be a significant hurdle when setting up a new React project. However, by understanding the root cause of the problem and implementing the solutions outlined in this guide, you can quickly resolve the issue and get back to coding. Whether you choose to downgrade the React version within your Create React App setup or switch to Vite, you'll be well on your way to building robust and efficient React applications. Happy coding!